We will
start our configuration Manger Current Branch 1511 installation by installing
SQL server.
The
standalone SQL server will host the Configuration Manger site database and
later we add WSUS database as well.
Quick
note on using remote SQL server, there are various arguments and disagreements
in-between various IT pros in the industry in using remote SQL database Vs
local SQL database.
The
decision is made of various technical or political considerations, at the end
It is up to you or your organization to decide which approach suitable for your
organization.
There
are many articles on the web which was already created for configuration manger
1511 installation based on the local SQL database server on the primary site
server.
For this
article I am using remote SQL server (SCCB-SQL) to host the site database,
which has bit different settings then local instance installation.
Prerequisites
for SQL server:
Windows Features:
|
·
.Net Framework 3.5
(Includes .NET 2.0 and 3.0)
·
.NET Framework 4.5
|
SQL Server:
|
·
Database Engine
|
Firewall Exception:
|
·
TCP 1433
·
TCP 4022
|
Optional Configuration / Installs:
|
·
SQL Server service account
·
SQL Server Reporting Services
·
SQL Management tool
·
SQL BI
|
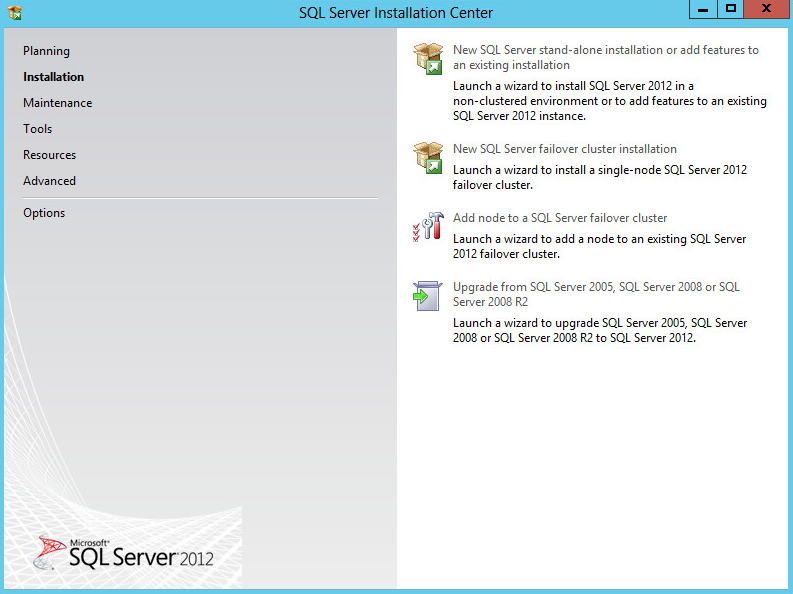
Let’s
start the installer by running setup as
Administrator;

Click on
Installation tab on the left side
then click on New SQL Server stand-alone
installation;
The installer
will scan for setup support rules.
If you see any failed operations, then that
needs to be fixed before moving ahead.
When all
the operations are passed click next;

Select a
desired SQL Server edition you want to install then click next;

Accept
the license terms then click next;

On the Product Updates window, you will see
available applicable updates.
If you
wish to add the update click next, otherwise unselect Include SQL product
updates then click next;

If you
selected to include the updates, then the installer will start downloading the
update then install them.

Occasionally,
you may get setup extract error as below.
To fix
the error re-start the server then start the installation process again.
If
restart won’t solve the problem, then unselect the Include SQL product updates then click next;

Installer
will run setup support rules again and will show the results of completed
operations.
Any
errors need to be fixed before going ahead. When all the rules are passed click
next;

On the Setup Role page, select SQL Server Feature Installation then
click next;

On the
Feature selection page, by default none of the instance features will be
selected;

Select
the required features on the Feature Selection page.
At this
stage, this SQL server is dedicated for only to host the CM site database. So
will install only Database Engine
Services.
If you
want, you can install Reporting Services
– Native instance for Reporting Services point.
You may
consider installing SQL Server Data tools
as well, so you can use SQL management studio to connect the database.

Once you
select the Instance feature, the installer will again run the installation
rules.
Once all
the operations completed successfully then click next;

Once you
select the Instance feature, the installer will again run the installation
rules.
Once all
the operations completed successfully then click next;
Click
next once the installation rules are completed successfully;

Review and Click next on the Disk Space Requirements window;

On the
Server Configuration, we need to configure an account for SQL Server Database
Engine and enter the password.
Next
click on Collation tab next to the Service Accounts tab;

Select SQL Collation, used for
backwwards compatibility option then from the list select SQL_Latin1_general_CP1_CI_AS
and click OK.

On the Database Engine Configuration window select Windows authentication mode;

Add a
domain account to Specify SQL server
administrators field.

Choose
whether you want to send error reports to Microsoft or not then click next;

The
installer will validate and run the installation configuration rules based on
the selected instances.
Once all
the operations passed then click next;


Once the
installation is completed, the feature installation status will show as
succeeded as below;

That’s
it. The Microsoft SQL server 2012 Database engine installation completed successfully.
Install
SQL 2012 SP3:
It is
required to install SQL Server 2012 SP3 before installing Configuration Manager
Primary site or CAS. Without
SP3, The installer will not connect to the database and will generate setup
error. Download SQL 2012 SP3 from below link;
Run SQLServer2012SP3-KB3072779-x64ENU as Administrator;

Installer will check the applicability of the update, click next to proceed;

Agree
the license terms then click next;

The
installer will select the instances by itself. Accept the defaults then click
next;

Wait
until the Check Files In Use scan is
complete then click next;

Review
the summary on Ready to update page then click on update;

The update
process will take time based on the installed instances;

An
installed feature status summary will be displayed on the Complete window;

We have
now completed installation of SQL server with Service pack 3.
As we are still with SQL server configuration stage, it is recommended to configure;
- Open required firewalls (4022 and 1433)
- Set maximum memory usage
- Set maximum memory usage
No comments:
Post a Comment