The Software Update Point integrates with Windows Server
Update Services (WSUS) to provide software updates to Configuration Manager
clients.
Careful consideration and planning is required before
adding a Software Update Point in the hierarchy.
If you have CAS then install and configure the software
update point at the central administration site first, and then install and
configure the software update points on other sites. Some settings are only
available when you configure the software update point on the top-level site,
which is the central administration site or the stand-alone primary site.
There are different configuration options that you must
consider depending on where the software update point is installed.
Always configure the Software Update Point at CAS or
Primary site to Synchronize the updates directly with Microsoft.
Additional software update points at a site, or Child
primary site and Secondary site synchronize from an upstream data source
location.
Prerequisites for
Software Update Point:
Windows Features:
|
.NET Framework 3.5: Including
◦.Net Framework
3.5 (Includes .NET 2.0 and 3.0)
.NET Framework 4.5: Including
|
Roles:
|
WSUS
|
Additional Install:
|
KB3095113 and KB3159706
|
Ports
|
8530 and 8531
|
Installing WSUS Role:
Prior to the release of Windows Server 2012, WSUS was a
separate download.
Starting from Windows Server 2012 and Windows Server 2012
R2, WSUS is included as part of the Windows Server operating system. However,
to install WSUS we need use windows feature and roles wizard.
Log on to the server on which you plan to install the
WSUS server role (eventually where we will be installing Software Update Point)
as Administrator;

On the installation type select Role-based or feature-based installation then click next;

Select the default options then click next on Select destination server;

On select server roles window select Windows
Server update Services then click next;

Click Add features on Add
features window;

Click next on select features window;

On Windows Server Update Services window, click next;

On Select role services window select only Database and WSUS Services then click next;

If we select WIDDatabse and Database, the setup will
provide “The following features cannot be
installed on the same server: Database, WID Database:”

Provide
a location path to store WSUS content then click next;

Provide a SQL server database instance on Database
Instance Selection window then click next;

Click Install once confirming all the roles and features;

The wizard will complete with configuration required
message. Close the Wizard.

Configuring WSUS DB instace and Content Path:
Now configure the WSUS to complete the WSUS installation.
Launch WSUS console, which will open Complete WSUS installation window.
Enter the DB instance. Which is your SQL server name where you want to
store the WSUS Database and also provide the content directory path.

WSUS DB Instace is: SCCB-SQL
Content Directory path is: C:\WSUSStorage

Close the complete WSUS installation window.
At this stage, if we logon to SQL server, you should be
able to see SUSDB created;

Installing hotfix KB3095113:
If you want to support Windows 10 feature upgrade
using WSUS then install KB3095113 after installing the WSUS.
Download the KB3095113 from https://support.microsoft.com/en-us/kb/3095113 and
it is straightforward process, just follow on screen instructions to complete the installation
Read the instructions carefully https://support.microsoft.com/en-us/kb/3095113 before starting the installation.
Installing hotfix KB3159706:
Update enables ESD decryption provision in WSUS. KB3159706 is an require update for Windows 10 feature updates. Follow the installation and post-installation steps at https://support.microsoft.com/en-au/kb/3159706
Installing WSUS Admin Console:
As we are using remote server for SUP, we need to install Windows Server update services tools (API and PowerShell cmdlets and USer Interface management Console) on the primary site server.
If we wont install Windows Server update services tools, then we will get following error msg;
Failed to create assembly name object for Microsfot.Update Services.Administratiron, Error = 0x80131701.
Supported WSUS version not found
Remote Configuration failed on WSUS Server
Setting new configuration state to 3 (WSUS_CONFIG_FAILED)
To install Windows Server update services tools, Launch Add Roles and Features Wizard,

Select Role-based of feature-based installation on Select Installation Type;

Select a server from the server pool on select destination server then click next;

Click next on Select server roles as we do not have to install any roles;

Select Windows Server Update Services Tools under Role Administration Tools.
make sure API and PowerShell cmdlets and User Interface management Console are selected.

Confirm the installation selections then click install. This will install WSUS console on the primary site.

Installing SUP Role:
Open the Config Manager console, then go to \Administration\Overview\Site
Configuration\Servers and Site System Roles, then Right click on Servers and Site System Roles then
select Create Site System server;

Select desired server under Select a server to use as
site system.
Enter the FQDN of the server name or use the browse
option to browse the server name in AD.
Select Use the site
server’s computer account to install this site system then click next;

Specify internet proxy server details if applicable then click next;

Select Software
Update Point role under specify roles
for this server then click next;

Select WSUS is configured
to use ports 8530 and 8531 for client communications (Default settings for WSUS
on Windows Server 2012) then click next;

Enter the proxy account details for Software update point
then click next;

Specify synchronization source, so the SUP will sync the
update catalog from the source;
If this Software Update Point is located on the CAS or
Primary Site, then select Synchronize from Microsoft Update.
If this is on the child sites, then select synchronize
from an upstream data source location.

Select appropriate synchronization schedule settings then
click next;

Select supersedence
behaviour then click next; if required select Run WSUS cleanup wizard;

Select the software updates classification which needed
and want to synchronize;


Select the language for software update file and software update summary details then click next;

Review the summary then click next;

If everything is configured correctly the wizard will
complete successfully.

The site installation will start by creating SMS folder under C:\ on the SUP site system.

Under the logs folder review the SUPsetup.log file for
installation details.
The log should display the installation is successful
message;

Initially before the WSUS updates Sync the the SUP status will not show much information;

Once the synchronizations starts, we can see sync updates in WCM.log on the primary site server;
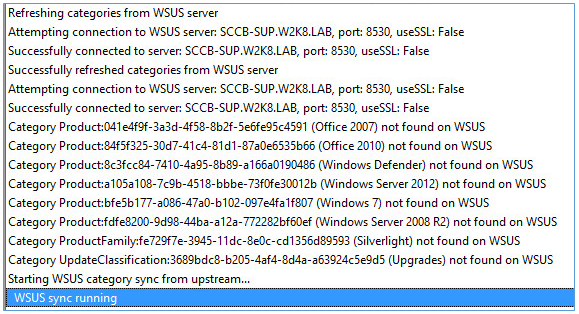
Wsyncmr.log will start showing the updates sync;

Click here
for complete SCCM 1511 Current Branch setup step by step guide.
Click here
for complete SCCM 1511 Current Branch step by step guide, step by step migration
guide, step by step monitoring and health check guide and step by step SCCM
Current Branch servicing guide.
No comments:
Post a Comment